Bread and Butter – Preschool/Family Storytime

Since my Loafing Around program was a couple of weeks ago (things have been busy… sorry I haven’t updated!), I don’t remember the exact agenda I used for the storytime.  But I did want to record the books and flannelboards that I used here.

BOOKS:
 

FLANNELBOARDS:

The Little Red Hen
from: Sierra, Judy.  The Flannel Board Storytelling Book 2nd Edition. 1997. pg 152
Little Red Hen Flannelboard

A traditional retelling of the tale, but I changed the object being baked from cake to bread to fit in with the theme better.

Yellow Butter, Purple Jelly, Red Jam, and Brown Bread Tongue Twister
rhyme and template taken from Miss Mary Liberry (though I altered the pieces just a little)
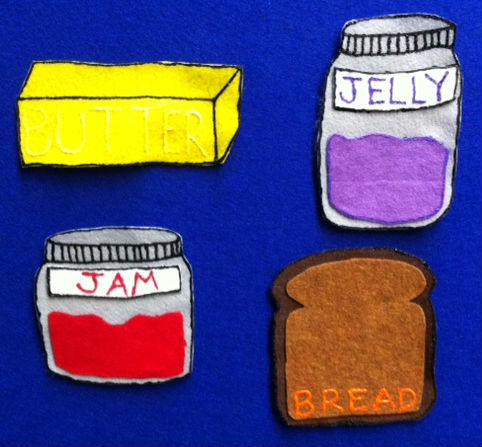
Yellow Butter Flannelboard
Yellow butter
Purple jelly
Red jam
Brown Bread

Spread it thick, say it quick!
Spread it thicker, say it quicker!
Now repeat it, while you eat it!
Yum!

Fred Fed Ted Bread Tongue Twister
Inspired by Miss Mary Liberry, and since I thought I might have a wide range of ages at this program, I wanted to do something that would work for older children at the program too.  I found this tongue twister online and thought it would make a cute flannelboard.  I got the pattern for the man from “The Three Pigs” in Judy Sierra’s  The Flannel Board Storytelling Book 2nd Edition (pg 151) and just drew in the bread in his outstretched hand.

Bread Tonguetwister
Fred fed Ted bread and Ted fed Fred bread.
We tried a couple of times to say this, and then I asked for volunteers to try out loud.

Movement:

Bread and Butter
Clap and and slap thighs in rhythm to this chant

Bread and Butter
Marmalade and Jam
Let’s Say Hello
as __quietly__ as we can.
Hello
Other verses: loudly, slowly, fast, high and low.
(Taken from Preschool Storytime Outlines)

Peanut, Peanut Butter (and Jelly)
I added a couple of verses at the beginning of this song about kneading the dough, baking the bread, and slicing the bread.

ACTIVITY:
Making Butter! (See this post for instructions.)

ADDITIONAL MATERIAL IDEAS:

Book: What to Do? What to Do? by Toni Teevin
Book: Monsieur Saguette and His Baguette by Frank Asch
Book: Bread is for Eating by David and Phillis Gershator
Book: The Tortilla Factory by Gary Paulsen
Book: Loaves of Fun by Elizabeth M. Harbison

ATTENDANCE: 71 (adults and children)

*To see the words to these movements and activities I use frequently, please visit my A-capella Movements Section on my Storytime Movements and Music Page

Making Butter at Storytime!

Since we are doing the “Reading is Soooooo Delicious” theme for this summer, my library celebrated with a system-wide Fun Food Week.  Each branch chose a food-related program to highlight at their location.

My program was a bread storytime where we made our own butter!  I got the idea for this program because I remembered making it in preschool (kindergarten?  it was a long time ago…), and I thought it was so cool then.  Apparently, science still amazes now, because the program (that my coworker coined “Loafing Around”) was a hit with both kids and parents — some even wanted to go home and try making more butter.

And making it is really simple!

Make Your Own Butter

You need a jar with a lid that closes tightly and heavy whipping cream.
Jar and Cream

That’s it!

Pour the whipping cream into the jar.  Leave some room so the cream can move around. Of course, you can vary the amount depending on how much butter you want to make.
Butter7

Shake! Shake! Shake!
Butter8

After shaking for a little while, the cream will turn into whipped cream.  You won’t hear liquid sloshing around anymore.
Butter3 Butter2

Keep shaking more, and the mixture will look like it is turning back to liquid in your jar.  It’s actually becoming butter and buttermilk.  In the photo below, you can see the lump of butter in the center of the jar, and then buttermilk surrounding it.
Butter4

Pour off the buttermilk to separate it from the butter.  (At home I just poured it out of the jar, when I did the program at the library we dumped it out into a bucket covered with cheesecloth.  You can see that on the right.  Also, at the library, we scooped up the butter each child made and put it into a plastic take-out sauce container, and handed them a popsicle stick for spreading.)
Butter10 buttermilk

If you are making a lot of butter at home that you will want to enjoy for a while, rinse off the butter under cold water to get rid of the buttermilk — this will make the butter last longer.  At the library, since we were enjoying the butter right away and only made a small amount, we skipped this step.

Put your butter on bread, and enjoy! For the Loafing Around program we created sandwich baggies that had a small sample of various kinds of bread: tortilla, French bread, lavash, challah, Irish soda bread and pumpernickel.  Each kid received a baggie to go with the butter they made.
breads

TIPS IF YOU DO THIS AS A LIBRARY PROGRAM:

– WIDER MOUTH JARS WORK BETTER.
Jars like the one pictured with the cream in the first photo work better than narrow mouth jars (like the ones you see in the shaking photos).    It is easier to get the butter out from these, and it just seemed to work better overall.  (We got our jars from The Container Store.  The 4 oz ones worked best.)

– TEST THE JARS FIRST TO MAKE SURE THEY DON’T LEAK
Since we couldn’t get enough of the good 4oz jars, we used smaller 3 oz ones for the program, and they were not leak-proof.  To solve this problem, we just put the jar with the cream in it inside a sandwich baggie.  This helped keep our carpet clean and worked just fine.

– DON’T USE SPICE SHAKER INSERTS ON TOP OF THE JARS
Since we couldn’t find enough of the 4 oz jars, we went with 3 oz narrower jars that were meant for storing spices.  In addition to a twist on lid, these came with snap off inserts that had holes for shaking out spices.  I thought, “Oh this might be a great way to drain the buttermilk without having to take the butter out of the jar!”  BUT NO.  The cream didn’t like having the lid their during shaking, and the holes just ended up causing a problems instead of a solution.

– HAVE MORE THAN ONE BUTTERMILK DRAINING STATION
If you have all the children in the program start making butter at the same time, they will probably all be ready around the same time.  We had two draining stations to pour off the butter set up, and we probably could have used one more.

– HAVE SOMETHING TO PUT THE BUTTER IN SO KIDS CAN TAKE LEFTOVERS My coworker came up with the great idea to use take-out restaurant sauce containers with lids and they were perfect.  This way, we didn’t have to give away the more expensive jars to the kids, and we could save them to use at another program in the future.

– USE VOLUNTEERS TO HELP OUT
If I did this program again, I would get more people to help me out.  Volunteers could help with the draining of the buttermilk and putting the butter into the sauce containers.  They also would have been useful for clean-up afterwards.

– MAKE DIFFERENT FLAVORS WITH OLDER CHILDREN
If I was going to do this program with an older audience, I might add some different flavor elements that kids could use to make flavored butter: herbs like chives or dill, sugars, salt, etc.

But, even for doing it the first time around this was a really fun program, and it was a great success as well.  I would definitely do it again!